How to Get Perfect Shopify Clothing Photos Without a Studio
huhu.ai Team
You have launched your Shopify store. The products are loaded, the theme is live, and the ads are ready to run. But your product photos are letting the whole thing down — flat lays that make your clothing look lifeless, hanger shots that undersell the fit, and hero images that look nothing like the conversion-optimised galleries you see on leading fashion stores. You are not alone. Product photography is consistently the number one reason Shopify clothing brands underperform on conversion.
The good news: you no longer need a studio to fix this. AI virtual try-on tools have made it possible for any Shopify clothing seller to produce on-model product photography at scale — without model bookings, without studio rental, and without post-production backlogs. This guide covers everything you need to know: what Shopify actually requires, why on-model images outperform alternatives, and exactly how to produce them with HuHu AI.
What Shopify Actually Requires for Clothing Product Photos
Shopify does not mandate a specific image format beyond JPEG, PNG, WEBP, or GIF, but Shopify's own image guidelines are clear about what performs best. The platform recommends square images at 2048 x 2048 pixels for maximum zoom quality, and notes that consistent image dimensions across your product catalogue significantly improve the professional look of your store.
Beyond the technical spec, the performance data tells a clear story: Shopify stores selling clothing convert at higher rates when they feature on-model images as the primary product photo rather than flat lays or ghost mannequins. The reason is straightforward — shoppers buying clothing are buying a feeling as much as a product, and a model communicates that feeling in a way a flat fabric arrangement cannot.
Why Flat Lays and Hanger Shots Underperform on Mobile
Over 70% of Shopify fashion traffic now comes from mobile devices. Shopify's own commerce trend data confirms that mobile conversion rates lag desktop significantly — and product image quality is a primary driver of that gap.
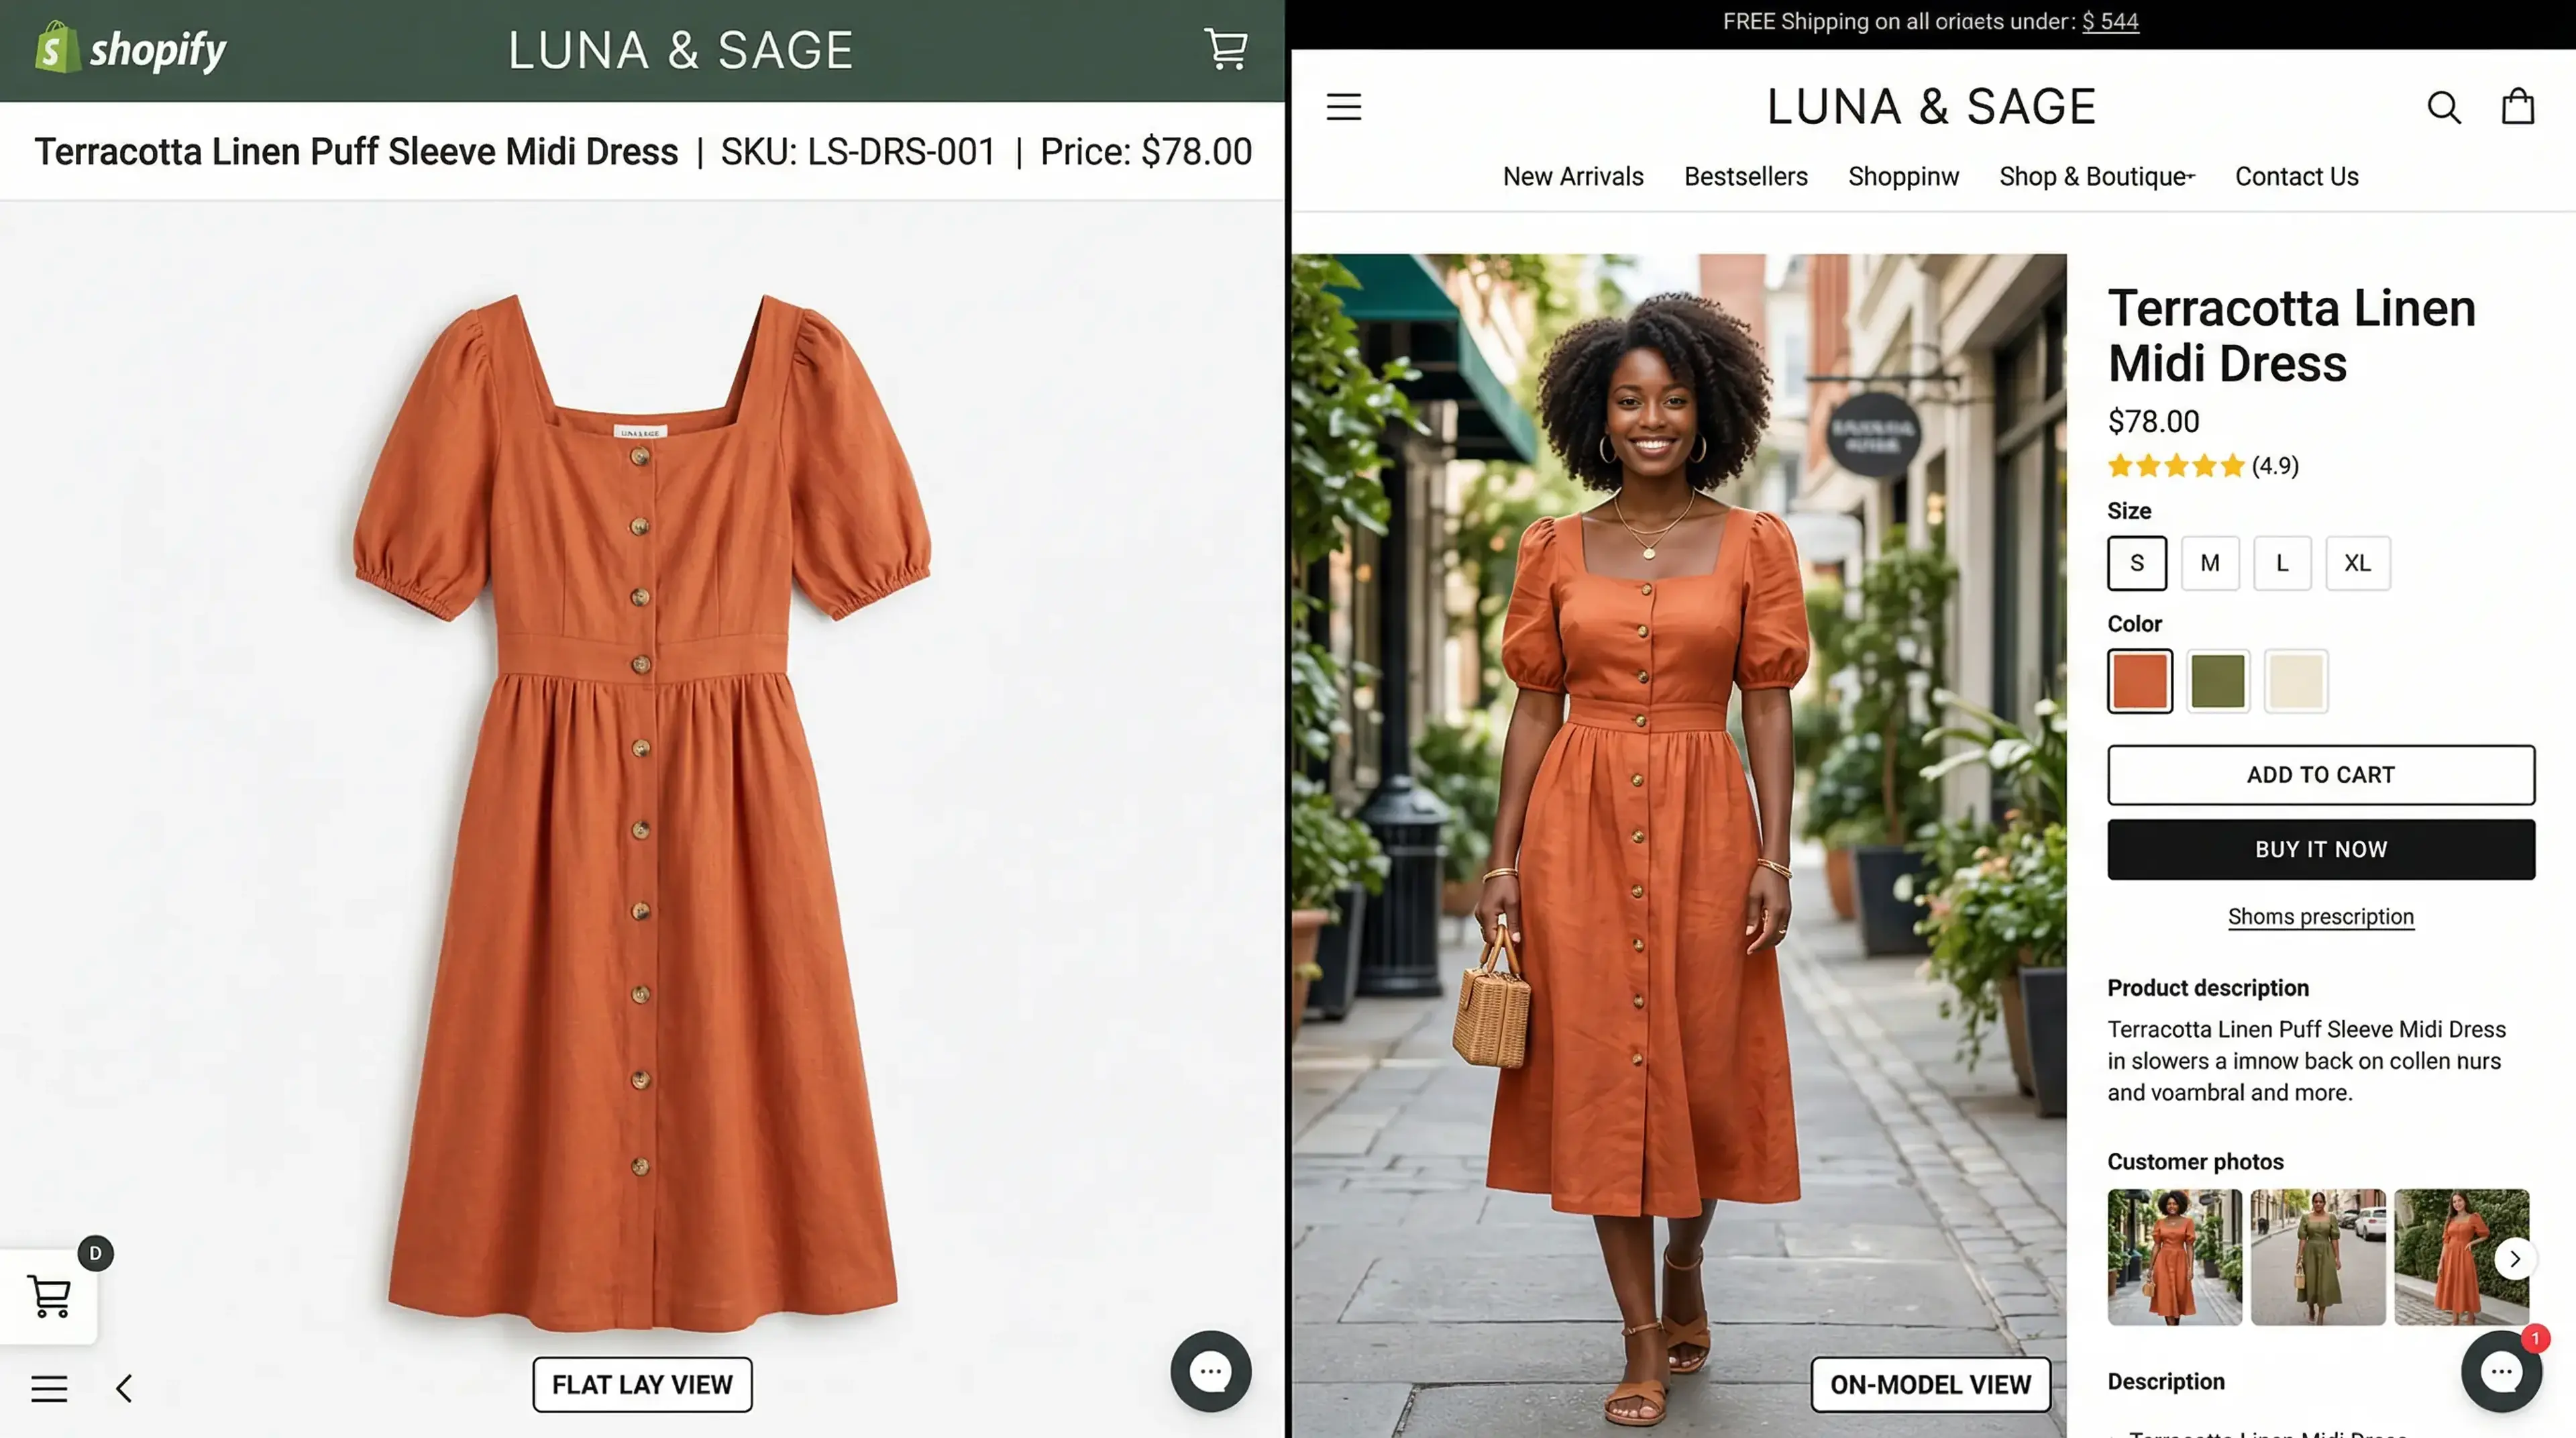
On a 6-inch phone screen, a flat lay tells you almost nothing useful about how a garment will actually look when worn. The drape disappears. The fit is invisible. The proportion of the garment relative to a body — the thing the shopper is most trying to understand — is completely absent. A customer looking at a hanger shot of a linen dress cannot tell if it will hit mid-thigh or ankle, whether the waist is fitted or boxy, or whether the fabric is stiff or fluid.
On-model images answer all of those questions instantly. That is why they convert better — not because they look more professional, but because they communicate more information more efficiently to the shopper's brain.
How AI Replaces the Studio for Shopify Clothing Photos
AI virtual try-on tools work by placing your garment onto a photorealistic AI model without any physical production. You upload a flat lay, ghost mannequin, hanger shot, or existing model image, and the AI figures out the fabric type, cut, and fit, then renders the garment onto a model of your choice in a new environment.
The output is a clean, high-resolution on-model photograph that meets Shopify's image spec requirements and is ready to upload directly to your product listing. No retouching required. No background removal. No model invoice to pay.
Step-by-Step: Creating Shopify Clothing Photos With HuHu AI
Step 1: Prepare Your Garment Image
Take a photo of your garment flat on a clean white or light grey background, or photograph it on a mannequin or hanger. The image does not need to be perfect — HuHu AI handles significant variation in input quality — but the cleaner the shot, the sharper the output. Aim for natural daylight or a ring light to avoid harsh shadows.
Step 2: Upload to HuHu AI
Upload your garment image to HuHu AI's virtual try-on tool. The platform accepts flat lays, hanger shots, ghost mannequin images, and existing on-model photos as inputs.
Step 3: Choose Your AI Model
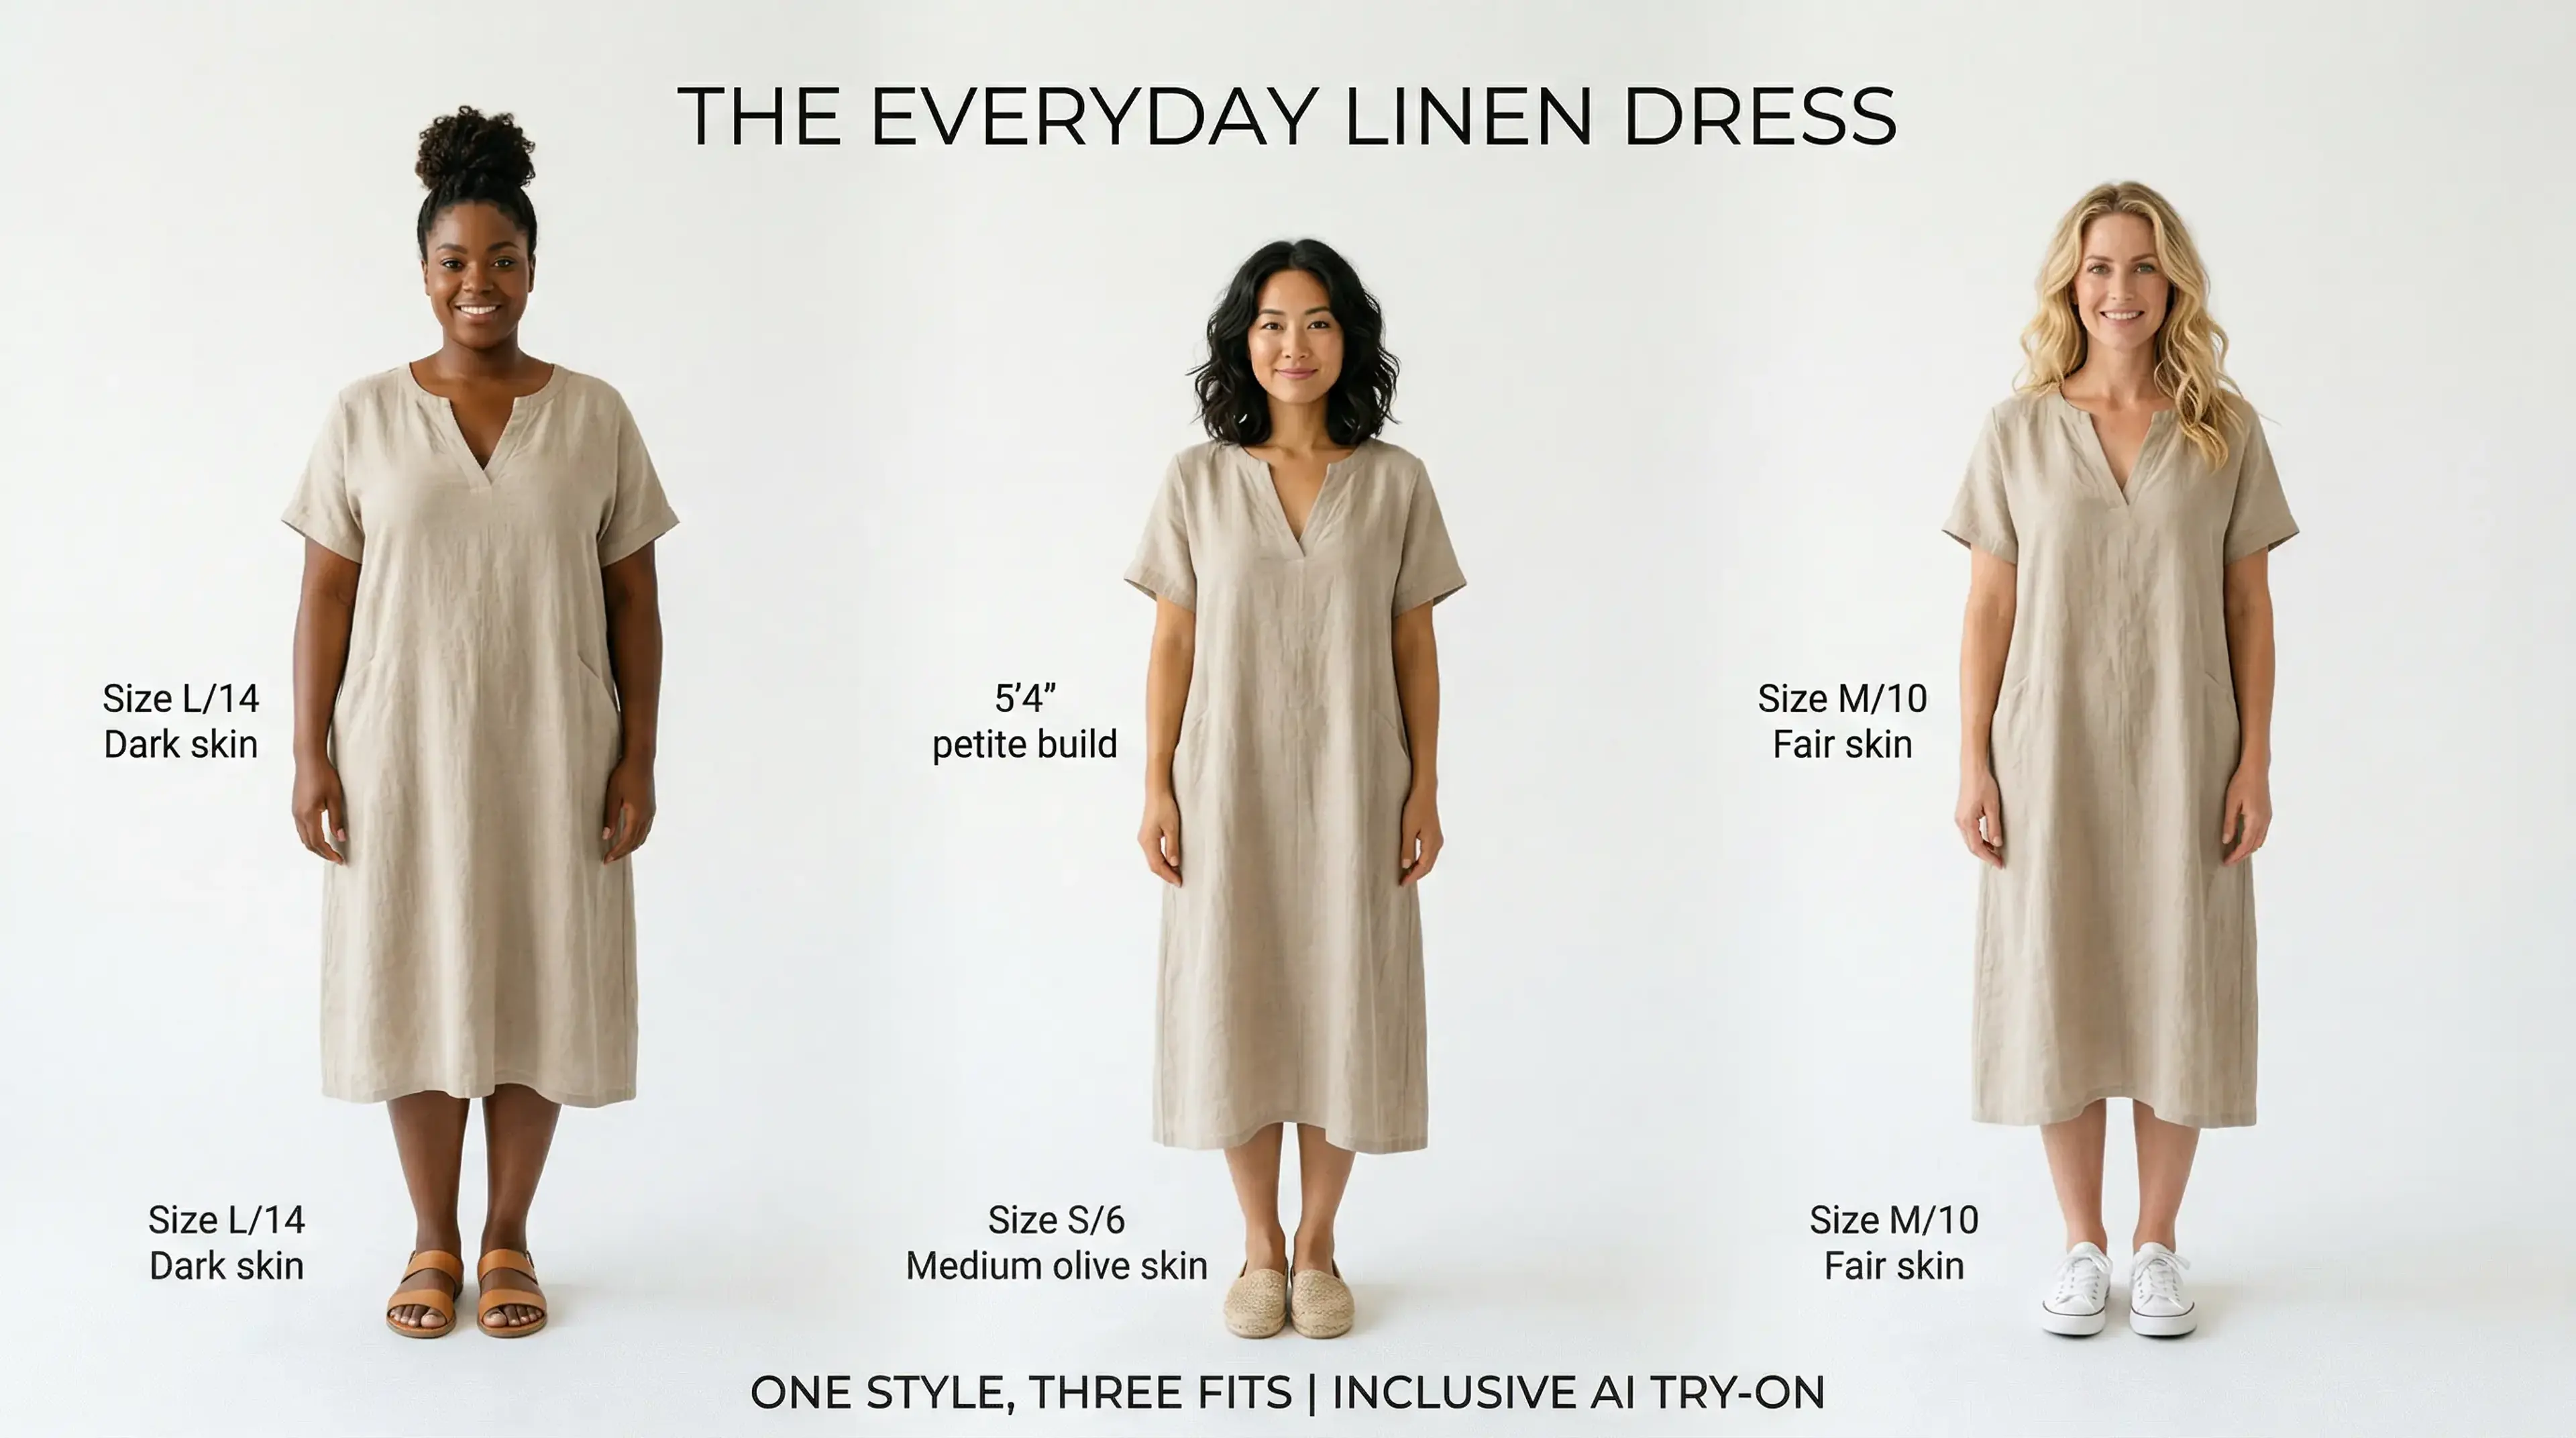
Select a model that reflects your target customer. HuHu AI lets you customise skin tone, body type, age range, and pose. If you are building a brand with a strong identity around inclusivity, you can generate the same garment on five different model profiles and use all five images in your Shopify product gallery — giving every shopper someone to relate to.
Step 4: Generate and Download
Generate your on-model image. HuHu AI outputs at resolutions suitable for Shopify's 2048 x 2048 pixel recommendation. Download the image and upload it directly to your Shopify product listing as your primary or hero image.
Step 5: Add Alt Text for SEO
Always add descriptive alt text to your Shopify product images. Shopify's own SEO documentation confirms that alt text is indexed by Google Image Search and contributes to both accessibility and organic visibility. A good format: 'Women's linen midi dress in sage green, on-model front view'.
Scaling to Your Full Catalogue: Batch Generation
The real power of AI product photography for Shopify sellers is not the individual image — it is the batch workflow. HuHu AI's Studio Team plan lets you upload an entire season's worth of garments and process them simultaneously, generating on-model images for every SKU at once rather than one at a time.
This is especially valuable for Shopify brands that launch new collections on tight timelines — market weeks, seasonal drops, trend responses. Instead of scheduling a multi-day shoot weeks in advance, you can generate your full new-collection gallery the same day the samples arrive.
What It Actually Costs: AI vs. Traditional Studio Photography
Traditional model photography for a Shopify clothing catalogue runs at approximately £50 to £150 per final edited image when you account for model booking, studio rental, stylist, photographer, and post-production retouching. For a 50-SKU catalogue, that is a minimum investment of £2,500 to £7,500 before a single product is sold.
AI clothing photography with HuHu AI reduces that cost dramatically — and more importantly, it removes the fixed cost structure that makes traditional photography prohibitive for small brands. You pay per image generated rather than per day booked, which means you can start with five products and scale to five hundred without a budget crisis.
Pro Tips for Shopify Clothing Photos That Convert
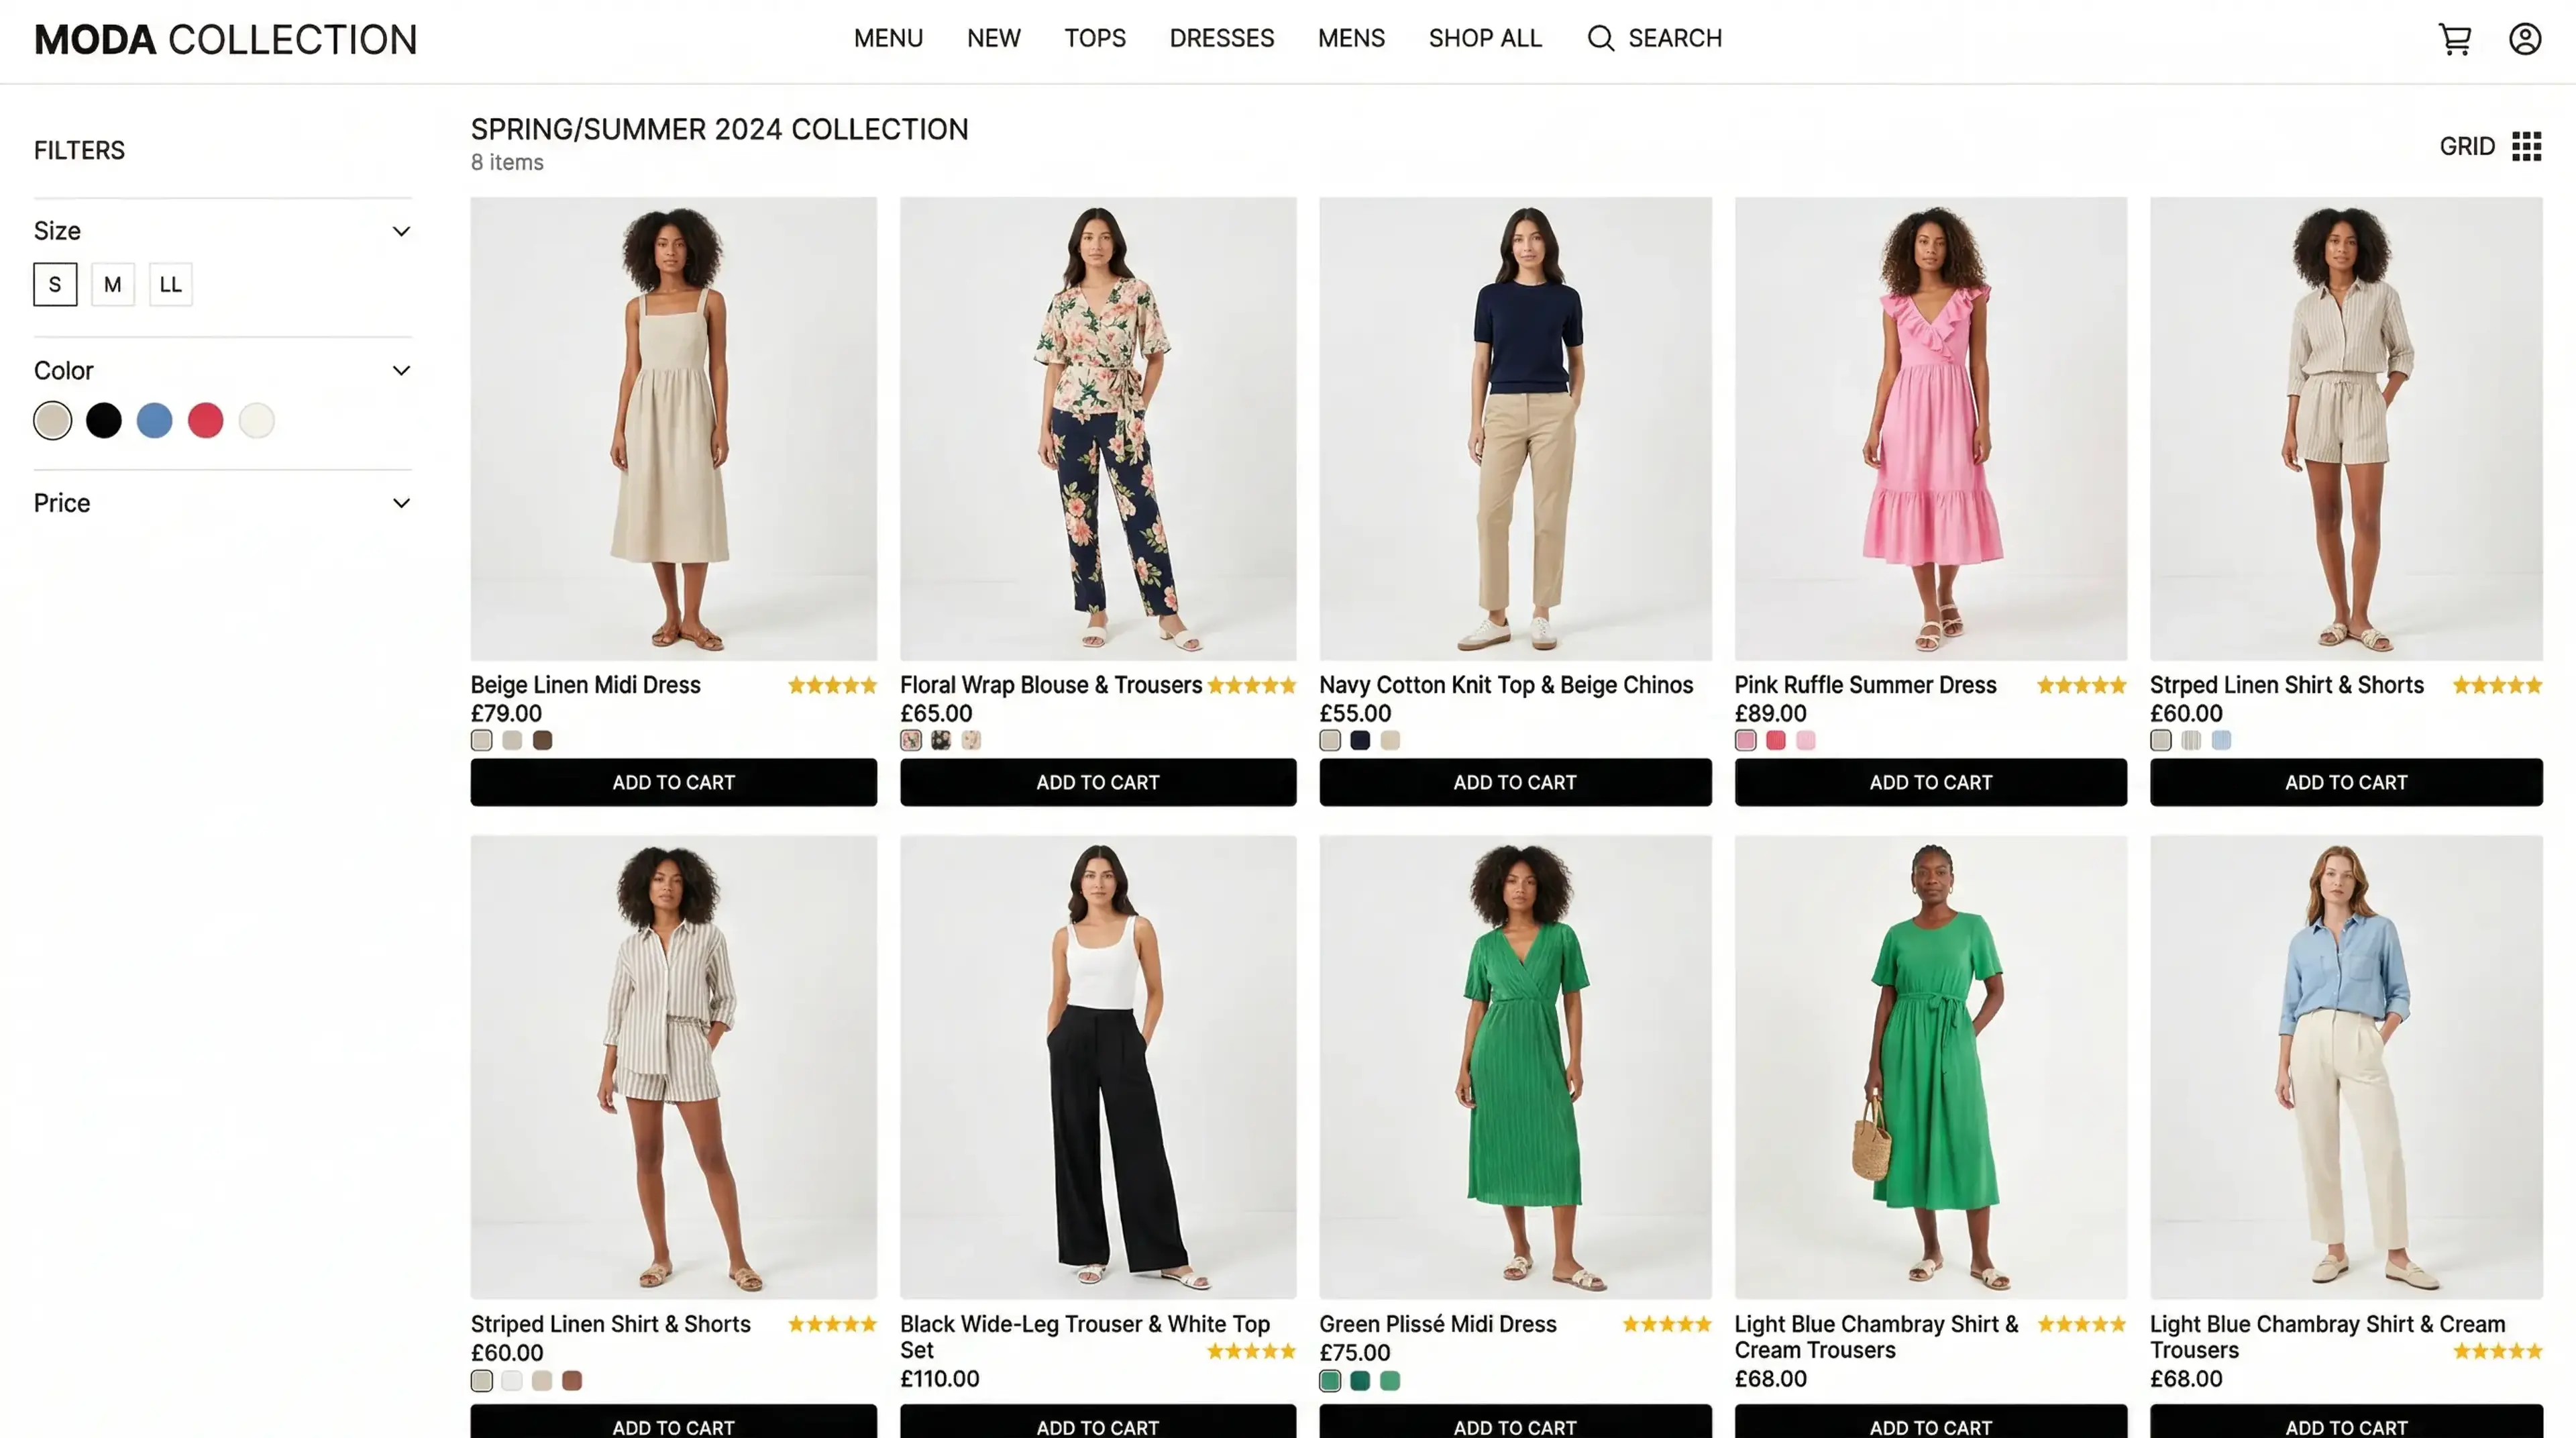
Use multiple angles. Generate front, back, and three-quarter views for each garment. Shopify allows up to 250 images per product listing — use the gallery to tell the full fit story.
Keep your model consistent across a collection. Shoppers browsing a new collection subconsciously expect consistency. If your dresses are on one model type and your trousers are on a completely different physique, it creates a disjointed browsing experience. Use the same model profile across a collection drop for a cohesive catalogue feel.
Pair on-model images with a flat lay as the second image. Some shoppers prefer the flat lay for checking fabric texture and print detail. A common best practice is on-model as hero, flat lay as secondary, detail close-up as tertiary. This covers every shopper preference in one gallery.
Optimise image file size. Shopify compresses images on upload but large source files slow your store's load time. Export AI-generated images as WebP at 85% quality — this delivers Shopify-spec resolution at file sizes under 500KB, keeping your store fast on mobile.
Ready to Upgrade Your Shopify Store's Product Photos?
You do not need a studio, a model, or a three-week production lead time to have Shopify product photos that compete with established fashion brands. HuHu AI's virtual try-on tool and AI fashion model generator give any Shopify clothing brand the ability to produce on-model imagery at catalogue scale — starting today, from the garments you already have.